
[ad_1]

Once again the Arduino community came to the rescue, and the most useful source I found was on a site called Renewable Energy Innovation, part of Nottingham-based Curious Electric Company.
It involves setting three bits in non-volatile memory – that are not available to the programme running on the ATtiny.
The Arduino IDE provides access to these through a function in tools called ‘Burn bootloader’ (available in the Tools menu).
 In proper Arduinos, this sets appropriate non-volatile flags and downloads the little operating system that allows them to talk to a PC and then run user code.
In the ATtiny, only the flags are set – there is insufficient on-chip memory to hold a bootloader – so while it is called ‘burn bootloader’ but it actually only sets flags.
There is something called AVRdude that will do it, but Renewable Energy’s technique saved me from learning about that . Instead, it involves editing the appropriate ‘board.txt’ file.
I have a couple of these files on my PC (found by doing a file search), one from the original Arduino IDE download and one from downloading the ATtiny extensions.
The flags are in three bytes: ‘low_fuses’ ‘high_fuses’ amd ‘extended_fuses’ – you can find appropriate settings using this on-line calculator, identified in the Renewable Energy blog.
Open the appropriate boards.txt file, and find the part of it is appropriate for the chosen operating frequency of the appropriate ATtiny.
![]() It looked like this in my case:
It looked like this in my case:
 Which makes a bit more sense of you drop the contents into Word, when the bit concerned appears like this:
Edit the appropriate flags byte entry (high_fuses in my case), re-save the file and then open the Arduino IDE.
– you may have to close the IDE if it was already open, and then re-open.
Do a ‘Burn bootloader’ and the flags get set.
I then re-edited the boards.txt file to avoid future confusion.
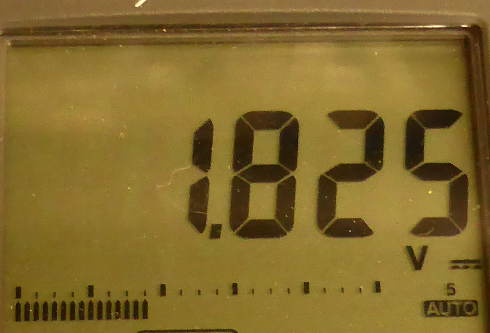
This worked, both setting a standard ATtiny85 to reset at 2.7V, and setting the low-voltage variant (ATtiny85V) to reset at 1.8V.
BTW – I have read that this only works once per device, and have not yet checked this one way or the other.
[ad_2]
Source link